Monday, 31 December 2012

New Year - new possibilities

2013


What a difference a thread makes!
While on a trip to Colorado during 2012, I had my usual take on a trip sewing project with me, which happened to be an applique kit.  I had taken some cream YLI silk thread with me (my usual choice of thread for applique) but found that the cream was just too light for the multi colour applique pieces on the cream background.  I found some other silk thread though in one of the quilt shops on this trip, made in Japan, called Kinkame, in a taupe colour, which worked well colour wise, but it was just not the same as the YLI thread. I have since put it aside for working with Japanese woven style fabrics, where I think it will come into it's own.
For the blocks in Dutch treat, I wanted to use the same colour thread throughout and wanted a thread colour to match the foreground fabric which is a mottled caramel/honey colour, but my existing supply of YLI silk threads were either too light or too dark, so I thought I would give the Kinkame thread another go.

Now I know that reverse applique is a totally new venture for me, but when my son asked if I had done it left handed with my eyes blind folded I knew I would need to rethink.
As far as I was concerned I had 3 options:

1. Forget about reverse applique and do them in my usual needle turn style
2. Try again with another thread
3. Forget about this quilt and use the blocks for another quilt

Not wanting to be defeatist or just plain being stubborn, I opted for number 2 and got my YLI silk thread out, in colour cream which is too light, but as I needed to 'try' it out first, I was happy to see what it would look like before I buy more thread.  I redid the same block in the same colour way to see whether it would make a difference.
This is the difference:


                           Kinkame thread     vs    YLI thread


Moral of the story .....
I can think of several, but I know I won't be doing hand applique unless I have my favourite thread to hand ;-)


Saturday, 29 December 2012

Christmas

I have been so busy with Christmas and all the children at home, that very little has happened in the line of 'proper' sewing.  I did however, finish these cushion covers just in time for Christmas.


 When I was in Salt Lake City in January, I met some local ladies when we attended a Handiquilter course together.
Classes were held on Wednesday, Thursday, Friday and Saturday morning and we then had a break (free time between 2 courses) before the next course started on Monday morning.  Stuck in a hotel room with no way of transport and not familiar with area (coming from England) for 2 days would have been very boring, but Julie, one of the local ladies, offered to take us on a quilt shop hop on Saturday afternoon.
I bought one of the patterns for the Christmas cushion covers on this trip but was disappointed that the other patterns in the series were sold out and wondered whether they would be available at any of the other local shops as the designer lived in the area.  I showed the pattern to Julie and she announced that the designer is her neighbour and proceeded to call her to ask if she has any patterns lying around at home and she did!  Julie then drove all the way home to her neighbours home to pick them up for me and drove all the way back to my hotel to get them to me!  How incredibly kind is that and how lucky?

 On the Sunday, Susan, another local lady on the course volunteered her time to take us to Park City, where we stopped at some outlet stores and a mall before having a late lunch at The Cheesecake Factory.  Hooray for Julie and Susan, lovely friends in Salt Lake City.

I also finished the yo-yo pumpkin men for next year, I thought I might try and make a snowman and a Santa too at some future date.


Oh the newly discovered delights of Pinterest!  I have found so many wonderful pictures on here and have created my own pinboards with ideas for future projects. What did I do before Pinterest?
I remember ..... wrote down the web address and a big long description of what I liked there in a little notebook that I kept next to the computer, and because there was so much written in the book, I could never find the exact thing I had in mind later.  With pictures saved on my Pinterest board, it is so much easier and quicker to find things. Only trouble is, I spend so much time looking at everything on Pinterest, that I don't have time for reading anymore!  So, I have made the decision, to only look at Pinterest once a week, and not spend hours drooling over all the wonderful quilt pictures out there.

I have so many ideas in my head right now and am trying to plan which projects I would like to do in the new year.  So many unfinished projects, so my aim is to finish 2 unfinished projects before tackling each new project.  Top of the list are my finished quilt tops that now need quilting.  I will post pictures of these when they are 'in progress'.


Plans for new projects include starting a "Dutch treat" quilt, all done by hand, so this will be my take with on travels project.  All blocks are sewn by hand in recessed (reversed) applique.  There are 196 blocks, no 2 the same.  Very exciting, I can't wait to get started on this. These are the fabrics for my 'Dutch treat", I am using a mottled caramel colour for the foreground and 15 shades of "Suede by PB Textiles" for the background. I have cut all my pieces this morning and plan on marking the designs out tonight and then bag it up all ready for sewing.


I am also planning on making a quilt to be raffled to raise funds for a charity called "Hope Asia", I will post details of this later, I am going to do foundation pieced star blocks for this, but am undecided about the fabrics for this at the moment.

For now, my children are all at home, so sewing is a bit low on the priority list, but I wish everyone a very happy Sewing Year for next year ;-)


Sunday, 9 December 2012

Mistake on hexagon quilt!


I have recently joined the British Quilters Guild and this week attended my first meeting with the ladies of Region Six in Wokingham for a Christmas coffee morning.  It was a very relaxed morning with a 'bring and buy' and a raffle, and then a wonderful 'show and tell'.  Most of the ladies had brought something in, some works in progress, others completed items, all done recently.  Some of the group has been doing a 'mystery block' project and they brought their quilt tops in.  Although they had all used the same pattern, it was amazing to see how different they all turned out as they had all used fabrics to their own taste.
I look forward to next week meeting the Guild ladies of Oxfordshire and can't wait to see what treasures will be shown at the 'show and tell'

I have worked some more on my hexagon quilt, all the applique is now done and I have cut all the pieces for the first border.  In my haste I decided to stitch the first row of blocks straight onto the thin border surrounding the centre panel and guess what.... I made no allowance for the return of the border on the adjoining sides, so my lovely little squares are now out by half a square at each end!
 I did think I could fudge it, and no one will know, being small triangles in the square blocks I sewed half squares at the ends to 'fix' this, but then I thought that I cannot kid myself and that I would think about it everytime I look at this quilt and who needs constant reminders of their own mistakes?  So tonight I have painstakingly unpicked it all so that I can have, if not a perfect border, one that is at least correctly sewn on.


I have started a new wallhanging, at least, the instructions are for a wall hanging, but knowing what I am like, I will probably find a way of turning it into a quilt.  This is the pattern and I am so excited about the quilting possibilities in this one.


It has taken quite a long time to copy the design out onto my fusible web (I always use Steam-a-seam 2) and then even longer to cut out the intricate design.  It is now, however, ironed into place and in the near future, I will machine applique it into place.
I am wondering whether I should stick to the flat colour black or make it look a bit more 3D with fabric paints or do some shading with quilting threads?   But this must wait for another day....


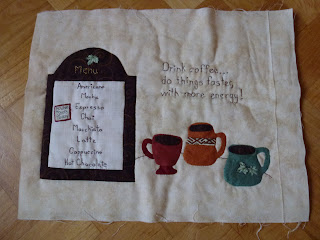
I have also started a small wall hanging this week called "Coffee time" (not because I don't have enough sewing projects on the go, just that I didn't have any hand sewing to do now that I have finished all my hexagons).
The hand stitching kept me busy for 2 evenings and now it has joined all the other projects in the machine sewing pile.
This is what it looks like at the moment:


And then, I had to decide what my next hand sewing project is going to be.  I have seen these lovely pumpkin dolls, made out of yo-yo's in Golden, just perfect for Halloween, and yes I know we have just had Halloween, but if I don't do it now, by next year October, I will be busy with some other project and probably not have time to prepare for halloween, so now seems like a really good time.  So, I have cut my little squares, to be turned into yo-yo's for the arms and legs and have even started some of the yo-yo's during a car journey.
I am using the Clover yo-yo maker and they are turning out really lovely


Thank you for looking, if you liked what you've seen, please leave a comment. Enjoy your day :-)


Sunday, 2 December 2012

Hexagon quilt


I decided a while ago that I would like to make a quilt with hexagons, using the English paper piecing technique.  Having made a bag before using 1/2" hexagons, I knew that I could handle this size and as I just wanted it for a central panel, rather than a whole quilt, this was the size I decided to use.  I purchased laser cut paper templates and cut all my pieces out (all 725 of them) and put it in a little sewing bag with sewing supplies and took it with on every car journey we made.  I even took it with to America and stitched on the plane and also on the coach.  It has taken just over 2 months and I have now stitched all the hexagons to the background fabric.


The pattern I am using is one by Jeanette Huff in her book "Quilts from Grandmother's Garden". Today I have prepared all my 'leaves' for appliqueing and plan to start stitching them in place tomorrow.  I can then cut the central panel to size and decide on the design for the borders, which I want to do in a round robin style.

 With temperatures dropping to -4 degrees over the last 4 nights, we have now reached winter.   I might have to get the kingsize quilt top that I have made nearly 3 years ago, quilted.  I made it for our bed, but never quilted it as the thought of quilting a kingsize quilt on my domestic machine, just frustrated me.  Why I didn't do it as a quilt-as-you go top, I do not know and why I haven't unpicked it and changed it into a q-a-y-g I know even less, but now that I have my Handiquilter, I have no more excuses, so I might get it started in next week.


Thursday, 29 November 2012

Kokopelli


I have recently come back from a trip to the American southwest with British Patchwork and Quilting.  I have made some lovely friends on this trip and met up with some 'older' friends from previous trips. Even though I have only been on 3 trips  with P&Q,  I am starting to feel like part of the 'family'.

The tour started in Santa Fe, New Mexico and then moved on to Colorado, where we visited Durango, Colorado Springs and Golden as well as a 2 day seminar with Ricky Tims in La Veta. We had plenty of stops at quiltshops as well as some wonderful trips such as the Silverton train and Pikes Peak Cog railway and the Mesa Verde and an unscheduled stop at Four Corners!  Other trips included Estes Park, Denver,  Garden of the Gods and Red Rocks Amphitheatre, where there was the most wonderful quilt displayed in the visitor centre.


Some of us then went on to Las Vegas and then to the North rim of the Grand canyon and Zion National Park.  On our last day, we were given the Team Colorado challenge, with a deadline of 28th March 2013.  Being organised and not one for leaving things to the last minute, I decided to make a start on this last weekend and starting drawing out my designs.  I have all along known that I wanted to base mine on 'Kokopelli', a mythical figure, being the god of fertility and agriculture and now a major tourist 'souvenir' of the southwest.  We saw Kokopelli's everywhere, in New Mexico, Colorado, Arizona and Nevada and even in Utah.  The challenge is for a quilt 20" square, no theme specified, just to be a celebration of our trip.

Of course, once I started putting my mind to it, I couldn't switch off and decided there and then what colours to use and the layout and even had some sort of quilting pattern idea although that changed once I had the quilt pieced.


'Santa Fe colours'


My 'Kokopelli' all ready and prepared for appliqué


Started quilting on Monday morning

My inspiration was firstly 'Kokopelli' but also the 'Santa Fe colours', turquoise with earthy tones and as we have been to Las Vegas, I had to incorporate a little bit of glitz too.  I used curved piecing (thanks to Ricky) and have inset both the borders. The fabrics are all from Ricky Tims's studio.  My initial idea for
the quilting was to stitch  pictographs in the border, (Kokopelli is one of a number of symbols that can be seen carved in rocks in this area), but I decided against this as it would be more appropriate in just earthy colours and the bright colours in this quilt did not 'sit' well with this idea.  I decided in stead to use some of the Navajo symbols and shapes.  I have left 4 little squares in the corners of the inner border (in green), this is to represent 'Four Corners', which is the only place in America where 4 states meet at the same place.


I have just finished the binding and all I now have to do, is stitch a sleeve and label on the back.


Saturday, 24 November 2012

Jewel box daisy


I am SO happy right now.  I started this quilt a month ago and finished it today.  Cutting out and sewing together all the blocks was so easy and was 'speed' pieced together in no time at all.  I knew I had a deadline to meet (today was my target date), so I needed to get on with the quilting.
Off course, nothing ever goes exactly to plan and when I started ironing my backing piece, which had been pre-washed, I discovered a red thread running through the white fabric, approximately halfway down!  I had specially bought this piece, which is extra wide backing, and now, when I am about to start quilting, I had to drop everything and go shopping for another piece in the same colour!  This was just not happening, we were about to go away for a long weekend with friends and I had no time for shopping, but I had a plan!
Having looked up where the nearest quilt shops are at our weekend destination, I started scheming how I was going to get to the quilt shops.  Lucky for me, my dear friend is also a quilter, so we packed the men off walking and shopping we went.  First quilt shop we got to had closed a long time ago (no updates on internet), so my hopes were on the second shop, which turned out to be set up in a residential area in someones conservatory!  Needs must so in we went.  Of course, no extra wide fabrics in stock, so I just had to buy some other lovely little fabric bundles that I fell in love with.  Don't they just look divine?  No idea yet what I will do with them.


I finally managed to track down some more backing fabric the following week, so set about to start quilting.  I didn't really want to do an all over pantograph design, even though for me, this would be the quickest way to get it quilted.  The quilt is a leaving present for someone that have been in our lives for the last 8 years and I wanted it to be a special quilt.

I wanted to separate the border areas of the quilt and make them frame the main body of the quilt, and this for me means freemotion quilting, so I started doodling my initial designs out on paper.  The fabric I used to make the quilt is from Moda and called 'Sunkissed'  and the fabrics included daisies, scrolls, circles and script.  This was my starting point.


I settled on large oversized daisies in the same style as the daisies in the fabric and then marked out where I wanted to quilt the daisies. In the open areas in between the daisies,  I decided to quilt scrolls, these would have to be done freestyle as the spaces between the daisies were not uniform.  The background was then filled in with pebbling.


The inner border was quilted in a scroll design, I did drew this out first so that I could be sure that it would fill the border space exactly.  The outside border was quilted with a pantograph, which consisted mainly of scrolls, but had some daisy petal shapes, which tied the whole design nicely together.


I have just ordered some new labels for putting on my quilts and these came this morning, which meant I could sew the binding in place and the quilt is now ready.


This quilt is all about sunshine and happiness so I hope that by giving this quilt, I can share all this with the person receiving it.


Wednesday, 21 November 2012

Christmas gift bags


Today I have managed to make 6 of these little bags.  It is such a simple pattern, which closes at the top with snap rods, made from carpenters tape, so no fixings required.  They are so easy to make and the possibilities are endless with all the lovely Christmas fabrics available now.
At first I wanted to stick to a theme and do them so that they all fit into the theme, but then I thought 'Maybe not, if we are going to use them every year, it might be more exciting if you don't know which bag you are going to get next'
The idea is that I will make lots of these gift bags in different sizes and we can re-use them every year.
With 4 kids and them all buying something for each other, we do use a LOT of wrapping paper, so this will be good for the environment!  Then it would of course be nice to have a few bags ready to give to  friends and family too.
The first few were made from a pattern by Stitchin' Sisters called Snap Happy 2.            
It was fine when I was making just one bag at a time, but when I decided to make a few, I modified the pattern so that I could have a 'production line' and this also meant I did not have to keep changing the colour of the thread on my machine.


On one of the bags, I had just enough fabric to cut out the outside piece, but not enough for the triangle tag, so I thought it might be nice to use ribbon in stead.  I had some red ribbon and as I played with it, it occurred to me that if I folded the ribbon into  a loop, I would be able to attach a gift tag to this loop. So, I abandoned the triangle tags and started attaching ribbons in stead.


On another bag, I used a directional print, and oh no, disaster, it looked lovely on the front, but the pictures on the back of the bag were upside down!  So, I decided to cut directional prints differently.  In stead of using one piece of fabric, I needed 2 identical pieces, which then get stitched back together so that the prints face opposite directions (this seam will not show up as it will be on the base of the bag).  Just remember to sew them together on what is to be the 'bottom' of the bag.
Of course, if it is a directional print,  you have to be careful how you cut it as you might end up with vertical stripes on your bag, when you wanted horizontal stripes, like I did in the picture below (LOL).


I am planning on doing some bags with a small thin ribbon loop next to the triangle tags, and will post a picture of these when I am done.
Today is my first ever blog, so it has taken hours of reading up on how to set up and then start the blogging process, I will learn as I go along. Hopefully, in the process I will learn a lot more about my computer and doing the 'blog' will encourage me to start more new projects and complete more of the famous UFOs.  I will also build up a record of what I do all day, so should anyone be so cheeky as to ask, I can point them in the direction of this blog.